Followers

Tuesday 30 October 2018

A little wild xmas card 1 tutorial using acetate and inking Tues 30 Oct 18


Hey there guys n gals,
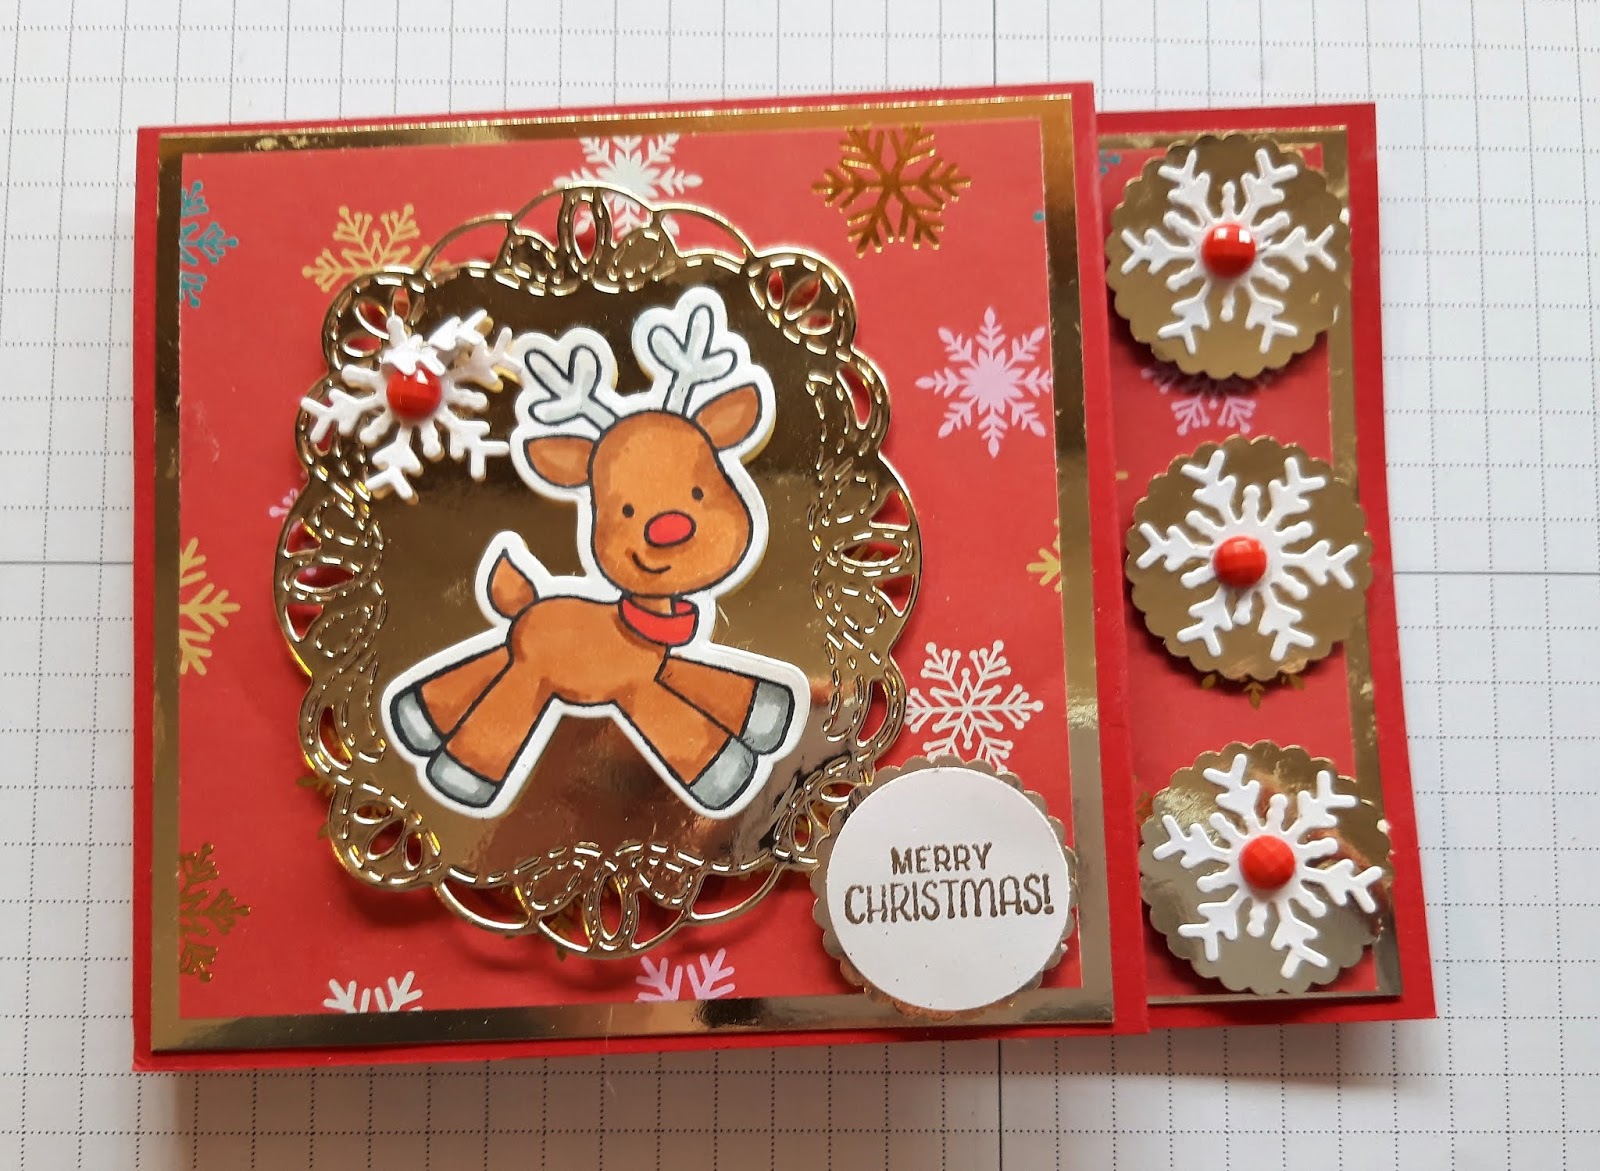
I've got a really cute Christmas card using a stamp set that isn't Christmas.  The stamp set is from Stampin Up and it's called A little wild.  It's really a tag stamp and die set which is perfect for cards where you're gonna see the back of the image.  The little woolly hats are a free stamp and die set from a mag a few years ago.  I'm so glad I kept it it's so useful at this time of year.  
Anyway I made a basic A6 card only I used Hunkydory Snowfall acetate.  It's 8 1/4 xx 11 1/2 and scored at 5 3/4.  You need a section to ink a background that is 5 3/4 x 4 1/8 and another section for behind it that measures the same.  I used the snow drift die from Stampin Up Winter Woods stamp and dies set.  The snowflakes are from Stampin Up Blizzard die.  I used Stampin Up inks Highland Heather, Balmy Blue and Blueberry Bushel.

Hope you like it
Till next time

Jacqui out xx

Facebook
Youtube
Pinterest
Instagram: jacquimckissock

Saturday 27 October 2018

Autumn Card for Joy of Sets October Challenge

Hi again guys n gals,

Today I have a card with a lovely Autumn Wreath on it.  I created this card for the Joy of Sets Facebook page October Challenge.  This was being sponsored by Clearly Besotted.

I used a card base from a Tonic craft kit and a stamp from Tonic kit  No 12.  The wreath is made using a die from Winter Woods.  This was a really quick card to make I just die cut loads of the leaves from various red, green and brown card scraps.  I stamped the sentiments in Merry Merlot and added some gems from my stash to finish.

It's so easy to do so give it a try.

Hope you like
Till next time

Jacqui out xx

Facebook
Youtube
Pinterest
Instagram - jacquimckissock

Thursday 25 October 2018

Non traditional Christmas Card Tutorial Thur 25 Oct 2018

Hi again everyone,

Hope I find you all healthy and happy.  Today we're making a non traditional Christmas card.  We're using Christmas stamps and dies but we're going for an orange background yippee!!  I used some Tonic Shimmer powders in Catherine Wheel and Solar Flare.  I also used the Playful Background stamps and white embossing powder.  For the second one I used the Buffalo check stamp which I adore.

I cut the Blizzard Thinlets into a piece of white card, then I sprayed with glue and added glitter.  The stamps sets I used were It Moose be Christmas by Creative Expressions and a set from the Magazine Making Cards Christmas 18.  

I hope you think I did a great job because I love these cards and i'm gonna be doing some more non traditional projects.

Till next time

Jacqui out xx

Facebook
Pinterest
Youtube
Instagram: jacquimckissock


Tuesday 23 October 2018

Christmas gift tags and box using Stampin Up Tues 23 Oct 18

Hi again everyone,

I've got a Christmas creation for you today.


I've made a gift for a pocket letter swap and I hope they like it.  It's 12 gift tags and a box to put them in.  I've used Stampin Ups scallop tag topper punch to create the tags and then I adjusted a box video made by Ann Melvin of Positively Papercraft.  She made a box for cards and I made mine smaller for tags.

The tags measure 2 x 4 3/4
Layers for front and back are 1 3/4 x 4

Then I just decorated like crazy lol.

Stampin Up Products Used

Signs of Santa stamps and dies
Seasonal chums stamps and dies
Oh what fun stamps
Winter woods stamps and dies
So Santa stamps

I do hope you like and please check out my youtube channel.

Till next time

Jacqui out xx

Facebook
Youtube
Pinterest
Instagram: jacquimckissock

Saturday 20 October 2018

Stampin Up Deer and Christmas tree snow scene card tutorial Sat 20 Oct 18

Hi there guys n gals and crafting pals,

I'm here with another traditional Christmas Card.  This scene is so classic and it really stands out from the crowd.  I've used inks for my background and put glitter paste through a stencil on one and stamped with versamark and white embossing powder on the other.
 My card base is 4 1/8 x 11 1/2 scored at 5 3/4.  The glitter layer is 5 1/2 x 3 7/8 and my inked background layer is 5 1/4 x 3 5/8.


Stampin Up Items Used

Winter Woods stamps and dies
Merry Patterns stamps
White embossing powder
Gold embossing powder
White texture paste.


Hope you like it
Till next time

Jacqui out xx

Facebook
Pinterest
Youtube 
Instagram: jacquimckissock

Thursday 18 October 2018

Lindor Christmas gift box Stampin Up Thur 18 Oct 18

Hi there everyone,

I have an awesome gift box for you today which will be an
awesome addition to my teacher gift bags for my grand kids, I have 6 to make and each bag has about 5 items in it so I need to start early.

Measurements in Inches

Back section 12 x 5 5/8
Score short side at 1 1/8 both sides
Long Side 1 1/8, 8 3/4 and 10 3/8

Front section 8 3/4 x 5 3/8

Score 3 sides at 1 1/8
On long side mark down 1 1/8 on score line and score to opposite score only.  This means you only have a score in the centre section and this will be a cut line.

Centre section 11 x 7 1/2
Score long side every 1 inch 
When it's glued together mark down 1 1/8 on each glued section and cut from top to this mark.

Hope you like my creation and I'd love to know if you give it a go.

Till next time
Jacqui out xx

Facebook
Youtube
Pinterest
Instagram:  jacquimckissock

Tuesday 16 October 2018

Double Slider Halloween card Stampin Up Tues 16 Oct 18

Hey there guys n gals

I'm back with probably my last Halloween card for this year boo hoo 😢.

So I thought I'd make it extra special and do a double slider one!  I've used Stampin Up products for both of them and they are both amazing.  The double slider surprise dies are from Lawn Fawn.  As I love making interactive cards I like buying dies that make it easy for me.

Stampin Up Supplies Used


Black Card
Mango Melody Card
Cauldron Bubble stamps
Cauldron Bubble dies
Cauldron Bubble dsp
Trick or Tweet stamps


Hope you like it.
Check out my youtube for full details


Till next time

Jacqui out xx

Youtube
Facebook
Pinterest
Instagram: jacquimckissock


Saturday 13 October 2018

Gift tag tutorial spinner, Halloween, Christmas Sat 13 Oct 18


 Hi there again guys n gals,
Hope you're all have a wonderful, crazy crafting day.

Today I'm making some gift tags yippee.  This is a short and sweet blog post but check out my youtube post which is long and not boring (I hope) lol.

Anyway the gift tags I'm using were gifted to me in a Pocket Letter swap by the lovely Kerry Mason so I'm endeavouring to use as many of the gifts I rec'd as possible.  Because I rec'd so many gift tags I was able to make loads of spinner gift tags as you need two tags for each of these.  I also made a shaker tag and an action wobbler one.  I had so much fun yippee.

Check out my youtube video for full details.

Till next time
Hope you like

Jacqui out xx

Youtube
Facebook
Pinterest
Instagram jacquimckissock


Thursday 11 October 2018

Z fold box in a card Thurs 11 Oct 18


Hi there guys n gals welcome to the world of Jacqui :) thanks for stopping by.

Today we're making a box in a card or whatever it's called lol.  It's one of those box cards in an actual card base.

I found this amazing creation on youtube made by France Martin so if you want to see hers go stop by.  


I made the first one with some Bluebird stamp sets and dies called Frosty friends and Woodland littles.

I can't wait to do some colouring now I've had one of my eyes fixed (cataract surgery)  to see if I can do any better a job lol.

My second one is made with the Stampin Up Signs of Santa stamps dies and papers.  I also used my scan n cut to cut out some of the images from the papers.

So onto the instructions ...

Card base is 11 1/4 x 4 1/8 scored at 2 3/4 and 5 1/2
Smaller section is 2 x 11 1/4 scored at 2 3/4 and 3 1/2 then
you flip it to the opposite side to attach.
Small inner sections (3) just under 2 inches tall and 4 wide and you score at 1/2 each side.

Check out my youtube video for all the layer measurements.

Hope you like it 
Till next time

Jacqui out xx

Facebook
Youtube 
Pinterest
Instagram jacquimckissock


Tuesday 9 October 2018

Reindeer trees and snow card using Tonic shimmer powder background Tues 9 Oct 18


Hi folks 

Today I have a quick card project for you.  For the first one I've used some cute reindeer I rec'd in a pocket letter swap from Sue Bishop (they are just too cute!!).  The trees in the first one were gifted from Sue too.  I created some backgrounds a while ago with Tonic Nuvo shimmer powders and Stampin Up stamps and I've used these for my backgrounds.


I've used trees and stamps from Stampin Up for the second card.  The sentiment for both came from a Lawn Fawn set.

I've used an A6 card base which is 5 3/4 x 8 1/4 scored at 4 1/8.  

Stampin Up Items Used

Seasonal chums stamps and dies
White glitter card for trees and snow
Trees from Winter Woods
Playful background stamps for background

Hope you like my project
Till next time 

Jacqui out xx

Facebook
Youtube
Pinterest
Instagram jacquimckissock

Saturday 6 October 2018

Z fold card Sat 6 Oct 18


 Hi there guys n gals 

It's Christmas hooray!!

Today I've made a Z fold Christmas card using some images I rec'd in a pocket letter swap and then some Stampin Up images etc.

I've followed some instructions from a video I saw on Stamp with Joy by Gaynor Boyce I've just changed the end section.  So this is how it's made. 

Measurements in Inches

Base 4 1/8 x A4 score at 4 1/4 and 8 1/2
4 1/8 x 5 1/2 glue onto excess of base
Gold layers are 4 x 3 7/8 (2)
5 1/4 x 3 7/8 (1)
Papers 3 5/8 x 3 3/4 (2)
3 5/8 x 5

Stampin \up Items Used

Gold and silver foil card
Stitched label thinlets
Spirited Snowmen
Blizzard Thinlets
Seasonal Chums


I hope you like this lovely project and it kicks off your Christmas makes.

Till next time
Jacqui out xx

Facebook
Pinterest
Youtube


Thursday 4 October 2018

Avon double nail varnish gift box tutorial using Stampin Up Broadway Bound Thur 4 Oct 18

Hi there everyone,

I'm back with another box tutorial for you.
Today we're gonna wrap another gift box for my girls for Christmas!!!
I know I hear you shouting at me how can I be so organised lol, I can with everything except my craft room which is generally a mess lol.  I have quite a few gifts bought lol I've finished my sons yay!

Anyway enough chattering onto the project.

 I made this one with stuff from my stash.  

Measurements in Inches

Shadow boxes for Nail Varnish (2)
8 3/4 x 8 1/4
Score all sides at 3/8, 1 5/8, 2 and 3 1/4

Wrap for Shadow Boxes re-inforced
7 x 5 (2)
Score Long Side at 4 5/8 and 6 1/2
Score Short Side 2 1/2

Base 10 3/4 x 8 re-inforced
Score all sides at 1 1/2 and 3

 Lid re-inforced
11 3/4 x 9

Score all sides at 1 3/4 and 3 1/2

Stampin Up Items Used

Broadway Bound Dsp

So that's it for todays project hope you like it as much as I do, and hope it provides some inspiration for your Christmas gifts.


Till next time

Jacqui out xx


Facebook
Pinterest
Youtube