Followers

Saturday 28 April 2018

Stampin Up card using Background bits and Sunshine Wishes

Hi again everyone,  Jacqui here with another project for you.  Today we're making a card.

I used a Flirty Flaming card base, some gold foil and white card for stampin on.  I stamped with Gold embossing powder and flirty flamingo ink.  I also added some gold thread and some pale pink gems to finish.  


Hope you like it.
Till next time 

Jacqui out xx

Stampin Up items used

Flirty Flamingo card
Whisper White card
Gold Stampin Emboss
Background bits stamps
Petal Palette stamps and die bundle
Sunshine Wishes dies

Facebook
Youtube
Email: jacquirobinson6@gmail.com

Thursday 26 April 2018

3x3 handmade notecard tutorial April 26

Hi there folks, Jacqui back with another project for you.  My uplink Ann Melvin of Positively Papercraft made a lovely handbag box in one of her recent tutorials.  I of course made one and then I made some lovely 3x3 notecards to fit in it.

 As I've never made a one layer card before this was a bit daunting to me.  But once I got the hang of it I began to enjoy it immensely.

The cards are 6 x 3 and scored at 3.

I've used a few of Stampin Ups stamp sets to make them.  The main ones I used were Oh so Eclectic and Petal Palette (which is a double stamp set).  I also used the We must celebrate (which retires at end of May 18).  And I used a Sale a bration set Party Pandas.  The Giraffe card is from a free set and I did a video previously showing these.
Stampin Up Supplies Used

Bloomin Love
Petal Palette
We must Celebrate
Oh so Eclectic
Whisper White card
Sticky sequins
Enamel shapes

Hope you like my project thanks for stopping by and hope to see you soon.

Till next time
Jacqui out

Youtube
Facebook
Email: jacquirobinson6@gmail.com 

Tuesday 24 April 2018

Handmade Stampin Up Gift box Tutorial for Chocolate bar. Using Painted with Love

Hi there folks, Jacqui back with another project for you. 

Today I've made a chocolate box.  My Stampin Up uplink Ann Melvin of Positively Papercraft.made this box and I resized it to fit a chocolate bar.

I've made one in the Springtime foils (retired) and Painted Love (retiring end of May).  I've used some stash stuff on the first one and then some petal Palette Thinlets and gold foil on the second one.

Measurements in Inches

Base re-inforced 10 x 6 score all sides at 3/4 and 1 1/2.
Left section 7 7/8 x 3 5/8
Score LS at 1 1/4 and 2 1/8
Right side 6 x 3 5/8
Score LS at 1 1/4 and 2 1/8
Underneath section 7 1/4 x 3 5/8
Sections to cover magnets (2) 3 5/8 x 1 1/4

Stampin Up Supplies Used

Painted with Love Dsp
Gold Foil
Petal Palette Thinlets

Hope you like what I've made and remember to check out my youtube channel and facebook page.

Till next time

Jacqui out xx

Youtube
Facebook
Email: jacquirobinson6@gmail.com

Sunday 22 April 2018

Impossible Card Tutorial using Stampin Up

Hi there folks, today I have an Impossible card project for you.

I've been looking at these on Youtube so when my lovely subscriber Karla asked me to do one I was pleased to do it.

I've made 2 sizes here an A6 size and a 6x6 size.

You need a piece of 5 3/4 x 4 1/8 for the A6 and a piece of 5 3/4 x 5/ 3/4 for the 6x6 envelope size.

On the SS make a pencil mark or light score at 1/2 way all the way down.  On the LS score at half way down to the centre score.  Turn it to the other LS and score in from each side at 1 1/2 both sides to the centre score.  

A 6 layer is 3 7/8 x 2 5/8 on left hand side mark at 1 3/4, then mark in at 1 3/8 on bottom from right mark at1 1/4 and mark straight up to meet the 1 3/8 line then cut along pencil lines.  You'll need 2 of these. 

5 3/4 x 5 3/4 size layer is 5 1/2 x 2 5/8 on bottom left side mark at 2 5/8 then draw across 1 1/4. Mark at top from left side at 1 1/4 and draw down to meet 1 1/4 line then cut along pencil lines.

Stampin Up Supplies Used
Petal Passions Dsp
Rose Garden Thinlets
Rose Wonder stamps
Painted with love Dsp
Sweet and Sassy hearts
Glimmer paper
Celebrate you thinlets

Hope you like my project 

Till next time 

Jacqui out xx.


Youtube
Facebook
Email: jacquirobinson6@gmail.com

Saturday 21 April 2018

Stampin Up Oh so Eclectic Handmade Gift box for Jar Candle

Hi there again everyone, I'm back with another project for you.  

Today I've made a lovely box for a mini jar candle and I've shown you how to decorate the candle too.


For this project I've used the Oh so Eclectic dies and the Bundle of Love Dsp.


Measurements in Inches

10 1/2 x 10 1/2
Score side 1 at 2 1/2, 5, 7 1/2 and 10
Score side 2 at 2 1/2, 7 1/4 and 9 3/4


Stampin Up Products Used

Oh so Eclectic Framelits
Bundle of Love Dsp
Gold Foil Card

Hope you like my project.
Till next time

Jacqui out xx

Youtube
Facebook
Email: jacquirobinson6@gmail.com

National Tea day blog hop

 Hi again everyone,  I'm here today with a post for National Tea day blog hop.

I made a lovely little mini tea caddy with lots of lovely Tea Sachets inside.

I actually chose my papers to match the teabag wraps!

I've used Whisper White card, Garden Green Card, Fresh Florals papers and the falling flowers to create my flower.

Hope you like what I've made and remember to check out all the other projects.

Till next time
Jacqui out xx
Stampin Up Supplies Used

Fresh Florals Papers
Garden Green card
Whisper White card
Falling flowers stamps

Facebook
Youtube
Email: jacquirobinson6@gmail.com

Thursday 19 April 2018

Stampin Up 6 coffee packet Gift box tutorial Youtube Tutorial

Stampin Up Handmade 6 Coffee Packet Gift box Tutorial

Hi there again you lovely lot,  Jacqui here with another project for you.

Today we're making a divided box that holds 6 coffee packets.  A perfect gift for that coffee lover in your life.


For this one I've used black card and the lovely Petal Passion Dsp.  

Measurements in Inches


Box 11 5/8 x 8 3/4
Score all sides at 1 1/4 and 2 3/4

Insert Section 1 10 x 6
Score 1/2, 1 1/2, 2 1/2, 3, 4, 5, 5 1/2, 6 1/2, 7 1/2, 8 and 9

Insert Section 2 7 x 6
Score at 1, 2, 2 1/2, 3 1/2, 4 1/2, 5 and 6

Lid 10 5/16 x 7 3/8
Score all sides at 1 and 2

Stampin Up Products Used

Black card
Petal Passion Dsp
Sunshine Wishes dies
Petals and more Thinlits
Petal Palette Stamps


Hope you like what I've created
Till next time
Jacqui out xx

Youtube
Facebook 
Email: jacquirobinson6@gmail.com

Tuesday 17 April 2018

Handmade Stampin Up Shaker Box, Gift Box for 5x5cards

Hi again everyone,
Jacqui back again with another project for you.
Today we're making a Shaker Box for 6x6 cards.

I think you'd agree it's a pretty special box to give anyone and you could put any gift in it you'd like!  
Perfect for a birthday or Christmas.


Measurements in Inches
Base 11 1/2 x 11 1/2
Score all sides at 2 1/2
Lid 10 5/8 x 10 5/8
Score all sides at 1 and 2

Stampin Up Products Used

Fresh Fig card 12 x   12
Painted With Love DSP

Hope you like my box.

Till next time 

Jacqui out xx


Youtube
Facebook
Email: jacquirobinson6@gmail.com


Saturday 14 April 2018

Stampin Up Handmade card using Tree rings stamp, inks, embossing and die cutting.

Hi there you lovely lot, Jacqui back again with another project for you.  Today we're making a card, I've stamped embossed inked and die cut and it's so pretty.  

So for my first card I stamped the Tree Rings background stamp and embossed in white.  I've used a rainbow of ink colours over the top of that.  I cut a strip die from my stash. And the Tonic die from my stash in Wild Wasabi and white.  Then the stamp greeting id from Great Big Greetings in Wild Wasabi.  I added some gems and toning ribbon to finish.

My second card is exactly the same except I used Rich Razzleberry card for my layer and die cut.  Then I used Rich Razzleberry ink for my stamp and the background.  I also used powder pink ink on the background.  The strip die I used for this one is from Swirly snowflakes.

Measurements is Inches

Card base 8 1/4 x 5 3/4 scored at 4 1/8
Rich Razzleberry Layer 5 1/2 x 3 7/8
White layer for stamping 5 1/4 x 3 5/8

Stampin Up Items Used


Email: jacquirobinson6@gmail.com

Hope you like my project and hope to see you again soon.

Till next time
Jacqui out xx


Thursday 12 April 2018

Handmade Stampin Up Coffee Cup Gift box Youtube video

Handmade Stampin Up Half exploding coffee cup gift box

 Hi folks,  Jacqui back again with another project for you.

Today we're making a coffee cup gift box with a statement bow!!!

I'm bought some coffee cups and coffee packets to make some projects and this is what I came up with for the coffee cup.

 And this is what it's like inside.  The coffee cup is held securely in place and the top of the box explodes down.

For this one I've used Whisper White card, Foil Frenzy in blue and some Kraft Card.  I used a decorative punch from X cut for the edges of the explosion section.

For this one I've used Black card, Golden Olive Card and the green Foil Frenzy.

The bow for the top of my box is from Tonic Studios.


Measurements in Inches

Insert for Coffee Cup 8 x 4 3/4
Score SS at 1 each side
Score LS at 1, 3 3/4, 4 3/4 and 7 1/2.

Box 9 3/8 x 9 3/8
Score 1 1/2 and 3 1/4 all sides

Outside layers (4) 2 3/8 x 1 5/8
Inside layers (4) 2 3/8 x 1/2

Lid Re-inforced 7 x 7 
Score all sides at 1 and 2    

Layers (1) 2 3/4 x 2 3/4
(4) 2 3/4 x 3/4        

Stampin Up Products Used             


Email:  jacquimurphy1@hotmail.com

Hope you like my project

Till next time

Jacqui out xx                  

Tuesday 10 April 2018

Foil frenzy gift bag Extra Large 10 April Stampin Up Gift Bag Tutorial youtube video

Stampin Up Foil Frenzy Extra Large Woven Gift bag

Hi folks, Jacqui back with another project for you. 

Today we're making a gift bag, and it's HUGE lol.
It's approximagely 11 1/8 x 11 1/8 x 4!!!  I know it's a bit early but I couldn't help myself and I made a Christmas one yay!!! 

For this one I used papers from my stash and black card.  It takes a lot of card to make but it's extra special and so worth it.

I've used 2 12 x 12 for the front and 2 for the back, 1 for the sides and a half for the bottom, so altogether I've used 5 1/2 12 x 12 sheets.  I added a special glittery snowflake and sentiment.
 For this one I've used the fabulous Foil Frenzy and I used a different pattern on the front and the back and it works so well!

I've really gone to town on the decoration for this one, I've added a tag an star decoration and some luscious co-ordinating ribbon I found in my stash.  I've embellished the star and tag with a sentiment and gems.

I'd be so happy to receive a gift bag like this and I'd never throw it away!
Measurements in Inches

4 sheets 12 x 12 cut into 1 strips

Bag Bottom 12 x 6 (measure bag width and cut to correct length
Score both sides at 1

Bag Sides  Measure bag height and add 1 for bottom and score.
Score both sides at 1

Handles (4) cut 2 large then remove centre with 2 smaller.

Stampin Up Products used

Foil Frenzy Dsp

Hope you like my project and please come back for more.  

Till next time 

Jacqui out xx

FB page
Youtube:  
Email:  jacquirobinson6@gmail.com

Saturday 7 April 2018

Acetate front card requested by Karla Stampin Up Card Tutoril Youtube video

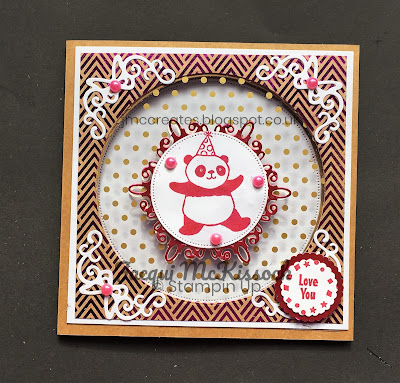
Acetate window card with topper on both sides using Stampin Up

Hi there folks, 
Jacqui here again with another project for you.

This has been requested by a lovely lady named Karla whom I have recently been fortunate enough to get to know.  I've made a 5 3/4 x 5 3/4 acetate front card and placed a floating topper both sides.  It's pretty and unique so I hope you have a go.  
For this card I've used a card kraft card base from my stash, I've used the Fabulous foil acetate and the Foil Frenzy card.

I've also used the Party Panda topper and sentiment.  (no longer available)
 Measurements in Inches

Card Base 5 3/4 x 5 3/4
White layer  5 1/2 x 5 1/2
Foil Frenzy 5 1/4 x 5 1/4

You'll need 2 white and 2 foil if want to decorate both sides.

 Put Foil Frenzy onto white layer and choose a circle die and cut in the centre. Place this cut section on card base and put die inside, then draw round, remove and cut.

Put Fabulous foil on front of card and place die cut layers on top and glue. Create your decorative topper for both sides and put on with foam tape.
For this card I used two different foil frenzy pattern and the A Little Wild stamp set and Little loves framelits.  On this one I used a square die cut behind my topper and the bees and flowers are from the same stamp and die sets.

Stampin Up Products Used

Foil Frenzy Dsp
Fabulous Foil Acetate
Pumpkin pie card
Tempting Turquoise card
A Little Wild Stamp set
Little Loves Framelits


Hope you like my project

Till next time

Jacqui out xx

Facebook page:
Youtube
Email: jacquirobinson6@gmail.com

Thursday 5 April 2018

Stampin Up Hexagonal jar candle with acetate window Youtube video

Stampin Up Handmade Hexagonal Gift box with acetate window.

Hi folks,

Jacqui back again with another project for you.

Today we're making a lovely hexagonal box for a mini jar candle.  I got the idea for this from Steph at EffiAnn cards.  She made a bigger one with different dies.  I've just changed the sizes to fit my candle and used the Lovely words thinlets.

This one is using the Springtime foils, the hugs circle die, the Sweet and Sassy hearts, gold 1/8 ribbon and the sentiments came from Labels to Love and Party Panda.  The acetate is the Fabulous Foil acetate.


I even made my own tag using the Sweet and Sassy hearts.


I made this one with papers from my stash and the heart from the Lovely words which is in a heart shape.  I also used enamel dots from Stampin Up. 

As you can see from the pictures I decorated my jar candle with matching papers and tag which gives a more co-ordinated and professional look.

Measurements in Inches

Box base 9 1/2 x 4 1/4
Score LS 1 1/2, 3, 4 1/2, 6, 7 1/2 and 9
Score SS 1 3/4

Lid 9 3/4 x 3
Score LS 1 9/16, 3 1/8, 4 9/16, 6 1/8, 7 11/16 and 9 1/4
Score SS 1 3/4

Stampin Up Supplies Used

Lovely words Thinlets
Sweet and Sassy hearts
Fabulous foil acetate
Enamel shapes

Hope you enjoyed the project.

Till next time

Jacqui out xx

Facebook page
Youtube
Email: jacquirobinson6@gmail.com


Tuesday 3 April 2018

Anns Diamond top box for Charlie spray Youtube video

Fancy top handmade gift box using Stampin Up Painted with Love

Hi folks,  Jacqui back again with another project for you.

This time I've made a box designed by my Stamping Up Uplink Ann Melvin of Positively Papercraft. She designed this box a while ago so check her out she's awesome.  All I've done is adjust the size to fit this mini Charlie.  This book would be amazing for a variety of things. I've used some Stash papers and dies for this one.


For my second one I've used Stampin Up Rich Razzleberry Card and the Painted with Love Speciality Dsp. My tag is from my stash and my sentiment is from Stampin Up Blooming Love stamp set.


Measurements in Inches

8 3/8 x 7
Score LS 1 5/8 and 6 1/2
Score Portrait 1 5/8, 3 1/4, 4 7/8 and 6 1/2
In each of the top sections (1 7/8 sized) score diagonally from both sides creating a X in each one.

Stampin Up Products used

Rich Razzleberry card
Painted with Love Dsp
Bloomin Lovestamps
Gold Foil card

Hope you like what I've created this time.

Till next time

Jacqui out xx

Facebook page
Youtube
Email: jacquirobinson6@gmail.com