Followers

Saturday 30 June 2018

teacher gift using stampin up. Pen, post it and note book chipboard folder Saturday 30 June 18


 Hi there everyone,

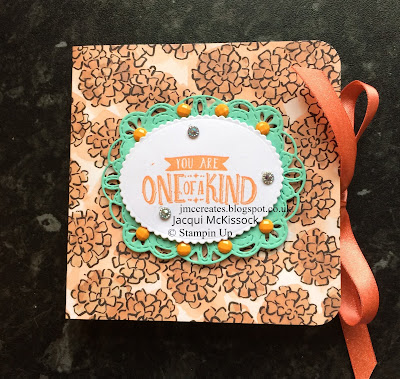
I'm back with another project for you.  This will be one of the gifts my grandkids teachers get when they leave this year.  It's a shadow box post it holder, a note book and a pen. 

It's contained within this durable chipboard case which makes it perfectly suited for a handbag or teachers schoolbag lol.

Anyway i'm hoping they'll like them as much as I do.  I've even added a little shrink plastic butterfly charm on this one.  I created it by colouring some shrink plastic and die cutting the butterfly out of it and then shrinking as normal.  I wasn't really sure this would work 
but thankfully it did.

This is how the inside looks.  I've chosen papers and card to match the pen and book.
Measurements in Inches

Chipboard 2 pieces of  5 3/4 x 4
2 pieces of  5 3/4 x 7/8
1 piece of 5 3/4 x 2 1/4

Card to cover chipboard
1 piece of  7 3/4 x 7 1/8 and 1 of 7 3/4 x 8 1/4 (overlap 1")

Add magnets before putting paper layers on!!!


Paper layers 2 pieces of 5 1/2 x 3 3/4
2 pieces of 5 1/2 x 3/4
1 piece of 5 1/2 x 2 1/4

Inside paper 12 x 5 5/8

Shadow box 6 3/4 x 6 3/4
Score all sides at 3/8, 3/4, 1 1/8 and 1 1/2


Wrap to hold notebook

4 7/8 x 3
Score LS at 1 each side

I've also done a longer version which holds a long shopping list pad.  

Stampin Up Items Used

Coastal Cabana Card
Tranquil Textures paper
Springtime Expressions Thinlits

Contact me via facebook or youtube for details.

Facebook
Youtube
jacquirobinson6@gmail.com

Hope you like the project, look forward to seeing you back again.
Till next time

Jacqui out xx


Thursday 28 June 2018

Wish cards using inks, stamps and dies from stampin Up Thurs 28 June 18

Hi there everyone,

Welcome to my blog, today i've got some gorgeous cards for you. The first one I made using versamark and white embossing powder with some star stamps, then I inked with Blueberry bushel and Gorgeous Grape  and I finished with the Wish die from the new Broadway bound set which I mega 
glittered the unicorn is from the Myths and Magic stamp and die set.


Then I moved onto the next one 
This time I used Mint Macaron and
 Blushing Bride with one of the 
Abstract Impression stamps.

I mega glittered the wish again to match and finished with the party hats in the same colour from Broadway Bound. 
For the final one I went with a Background bits stamp and the same die and hats from Broadway Bound.  This time I used Pineapple Punch and Merry Merlot.  I used an edge die from the stitched framelits on all sides of the card.  

I used the card the same colour as the ink on each project.

Card Dimensions 5 3/4 x 8 1/4 scored at 4 1/8.  
First layer is 5 1/2 x 3 7/8
Stamping layer 5 1/4 x 3 5/8

Stamping Up Items Used

Blueberry Bushel ink
Gorgeous grape ink
Mint Macaron ink
Blushing Bride ink
Pineapple Punch ink
Merry Merlot ink
Myths and Magic stamps and dies
Abstract Impression stamps
Tabs to go stamps
Background bits stamps
Broadway Bound stamps and dies
Tonic glitter Pink Diva
Tonic glitter Violet Infusion

Hope you like cos I adore them.
Till next time

Jacqui out xx

Facebook page
Youtube
 Email - jacquirobinson6@gmail.com

Tuesday 26 June 2018

3x3 diagonal fold card and box tutorial using Stampin up dsp etc.26 June 18

 Hi there everyone, 

Welcome to JMC Creates, today i've made some fancy fold diagonal cards that are only 3x3.  Omw they are so cute!   You'll just love them!

Anyway I better give you some details, so here we go.  You get the best idea of what to do over on my youtube so please stop by and think about subscribing.
Measurements in inches

Base 9 x 3
Score Long side at 1 1/2 and 3 then make a mark at 4 1/2

Turn to other side and repeat.  

Then score from the top mark with a ruler to the bottom of the first score line on each side.


Turn to other side and repeat.

Because I've only used 6x6 papers I needed to be inventive. I cut 2 pieces that were 2 3/4 x 1 1/4 and one piece that was 2 3/4 x 5 1/2.  Make sure you re inforce the score lines once you've added the papers.

Then decorate anyway you want.

Stampin Up Items used

Blueberry bushel card
Call me clover card
Grapefruit grove card
Pineapple punch card
Lovely lipstick card
Very vanilla card
In colour dsp 6 x 6
Oh so eclectic stamps and dies
Stitched Labels Thinlits

Retired Items Used

Myths and Magic stamps and dies
Bundle of Love dsp
Sweet and Sassy hearts
Tabs for everything

Facebook page
Youtube 
Email: jacquirobinson6@gmail.com

Hope you love it
Till next time

Jacqui out

Saturday 23 June 2018

Stampin Up Laer cuts Gorgous Grape and Pool Party card Tutorial Sat 23 June 2018


 Hi folks, i'm back today with a card tutorial for you.  Today i'm using the lovely lasercut papers from stampin up.

You get full sheets and you also get sheets with 6 of this size on them which are perfect for our card fronts.

I added mine to some vellum then onto a Gorgeous graper layer.  The base layer is Very Vanilla.

I've used the sweet and sassy hearts and flowers from Bloomin Love Framelits and the Springtime Impressions thinlets..

Measurements in Inches

11 1/2 x 4 1/8 scored at 5 3/4 (top folding notecard)
Gorgeous grape layer is 3 3/4 x 5 1/4
Vellum and lasercut are 3 1/2 x 5

Stampin Up Items Used

Lasercut papers
Gorgeous grape card
Pool party card
Sweet and Sassy Framelits
Detailed with love stamps
Bloomin Love dies (flower)
Springtime impressions (flower)

Hope you like my card
Till next time
Jacqui out xx

Facebook
Youtube
Email: jacquirobinson6@gmail.com


Thursday 21 June 2018

Faceted Lid candle gift box tutorial using Stampin Up Thursday 21 June 18

 Hi there guys, gals n crafting pals,

I'm back again with another awesome tutorial for you.  Today I made a box with a faceted lid for a mini jar candle.


I first saw this type of top as a complete box on Positively Papercraft.  Then I found the crafty sparks youtube tutorial for a separate lid and I adjusted it to fit my candle. And yay I love it!

I even decorated the candle with matching paper, ribbon and charm to give that luxury feel.

Then I finished it off with a matching tag.


Measure ments in Inches

Base 11 1/2 x 9 5/8

Score Long side at 2 3/4, 5 1/2, 8 1/4 and 11

Score Short side at 2 3/4 and 6 1/4

Lid A4 length x 5 1/8

Score Long side at 2 7/8, 5 11/16, 8 1/2 and 11 3/8

Score Short side 11/8 and 2 3/8

Then score each of the large top squares from corner to corner diagonally making a X.

Stampin Up Items Used

Share what you love Dsp
Scallop Tag topper punch
Leaves charms
Saleabration 2018 ribbon
Pressed flowers hostess set 2018

Another great gift idea for a teachers leaving gift.

So I really hope you love it like I do and give it a go.k

Till next time
Jacqui out xx

Youtube
Facebook
Email: jacquirobinson6@gmail.com


Tuesday 19 June 2018

Faceted bottom gift box tutorial for mini faceted candle Tues 19 June 18

 Hi there guys, gals n crafting pals,

Today I have a lovely faceted bottom box for you for these lovely 
small faceted jar candles.

I found this idea on Positively Papercraft and I adjusted it to fit these small candles as they match so perfectly.

Measurements in Inches

10 3/4 x 10 1/2

Score Long side at 2 1/4, 5, 7 1/4
 and 10 3/4

Score Short Side at 1 3/4, 4, 6 1/2 and 8 3/4

On the bottom section of the box mark 2cms on all sides of the corner sections and join these up with your score tool to create a complete square, comprised of 4 triangles.

Stampin Up Supplies Used

Share what you love dsp
Shaker shapes framelits
Abstract impressions stamps
Stitched label framelits 
Treat bag framelits
Acetate


I hope you like todays project and I appreciate you stopping by and hope to see you again soon.

Till next time

Jacqui out xx

Facebook 
Youtube
Email: jacquirobinson6@gmail.com


Saturday 16 June 2018

Post it note V3 for males using chipboard

 Hi there guys gals n crafting pals,

Jacqui back again with another tutorial for you. 
 This is version 3 of my post it note holder, and this one is designed as a male teacher gift.


Measurements in Inches

Chipboard 4 1/4 x 3 3/4 (2)
3/4 x 3 3/4 (1)

Outer paper 11 1/2 x 5 3/4 (1" overlap all sides)
Inner paper 3 1/2 x 9 3/8
Box for post it 5 x 5
Score all sides 1/2 and 1

Stampin Up Items Used

Tranquil textures dsp
Confetti celebration stamps
Great big greetings stamps
Night of Navy card

Hope you like it 
Till next time

Jacqui out xx

Facebook
Youtube
Email: jacquirobinson6@gmail.com

Thursday 14 June 2018

Stripes and stamping card tutorial Thursday 14 Jene 18

Hi there guys, gals n crafting pals,

Today I have another card tutorial for you.  This one is a quick one using scraps and stamps.


Card base is 8 1/4 x 5 3/4 and scored at 4 1/8.
Stamping layer is 3 7/8 x 5 1/2.
Strips are cut at 1/4.

Stampin Up Items Used

Floral Phrases stamp
Coastal Cabana Card
Whisper White Card
Gold embossing powder
Classic label punch
Detailed with love stamp

I really hope you like it
Till next time 

Jacqui out xx


Youtube
Facebook
Email: jacquirobinson6@gmail.com

Tuesday 12 June 2018

Bloomin Love card using Stampin Up Tuesday 12 June 18


Hi there everyone,

Today I've got a card for you.  This heart was the left over bit from my teacake box so I didn't want to waste it and I used it for a card.

Measurements in Inches

Card base from stash 5 7/8 x 5 7/8
Coastal Cabana layer 5 5/8 x 5 5/8
Whisper White Layer 5 3/8 x 5 3/8

Stampin Up Items Used

Background bits stamps
Oh so Eclectic stamps
Bloomin Love dies
Classic Label punch
Gift of Love stamps (retired)
Detailed Trio punch
Mint Macaron ink
Flirty Flamingo ink
Coastal Cabana card
Whisper White Card

Hope you like it
Till next time 
Jacqui out xx

Facebook
Youtube
Email; jacquirobinson6@gmail.com


Saturday 9 June 2018

Teacake box using Stampin Up dsp & dies Saturday 9 June


Hi there everyone,

Today I've got a lovely gift box for 4 Tunnocks teacakes (pity i'm on a diet!!  I love these yum yum lol).

Measurements in Inches

Base 12 x 12 (re-inforced)
Score all sides at 1 7/8 and 3 3/4

Lid 10 1/2 x 8 1/8 (re-inforeced)
Score all sides at 7/8 and 1 3/4

Inserts 4 7/8 x 4 3/4
Score at Short Side 1/2, 2 3/ and 4 31/4

Acetate 4 1/2 x 4 1/2

This is a perfect "Just Because" gift so I hope you love it like I do.

The idea came from Sam at Mixed Up Craft I just re-sized some of it so go check her out.


Stampin Up Items Used

Bloomin Love die (retired)
Coastal Cabana card
Share what you love Dsp


Youtube
Facebook
Email: jacquirobinson6@gmail.com

Once again hope you like
Till next time

Jacqui out xx


Thursday 7 June 2018

Flip photo album tutorial using Stampin Up dsp and dies Thursday 7 June 18


Hi there everyone,

I'm back with another project for you. 
 Today I've made a flip photo album using white card, chipboard and the Petal Passion dsp.


Measurements in Inches

Chip board
6 3/4 x 5 1/2 (2)
6 3/4 x 1 1/4 

Outer paper for Chipboard
8 3/4 x 7 1/2(1)
8 3/4 x 8 
Overlap at 1"

Dsp for inside 
6 5/8 x 3
6 5/8 x 5 1/4 (2)

Dsp for outside
6 1/2 x 5 1/4 (2)
Spine 6 1/2 x 1

Waterfall guide 5 x 2 1/4 (2)
Score Short side every 1/4

Waterfall flip sections
 5 x 4 3/8
Score Short side 3/8

Waterfall Dsp Layers
4 3/4 x 3 3/4

Stampin Up Items used

Whisper White card
Petal Passions dsp (retired)
Celebrate you thinlets

Hope you like
Till next time 

Jacqui out xx

Email jacquimurphy1@hotmail.com

Tuesday 5 June 2018

Double slider card using Stampin Up Tuesday 5 June 18

Hi everyone,

Today I have a card for you.
It's a Double slider card!

I found this project on Sam from Mixed Up Crafts Youtube Channel when I was looking for inspration for my nieces 16th birthdy.

There are lots of other tutorials but I liked that Sam made a stand so the card could stand and be displayed.

I've used Garden Impressions 6 x 6 papers and a Tonic die for this one.

Measurements in Inches

Stand 11 1/4 4 1/4
Score Long side 4 1/2, 9, 9 7/8 and 10 3/4

Front 4 1/2 x 4 1/2
Layer 4 1/4 x 4 1/4

Pull outs 3 1/2 x 4 1/4 (2)
Layers 3 1/4 x 4


 Mechanism 4 1/4 x 4 1/4
Score at both sides from 3/8 down to 3/8 then join these scores together and cut out.  Cello will wrap round this.

Tabs to re-inforce 4 1/2 x 2 1/2

Cello bag approx 3 1/4 x 8


Stampin Up Items Used

Garden Impressions Dsp
Blueberry Bushel Card
Detailed with love stamps
Blueberry Bushel Ink


Youtube
Facebook 
Email: jacquirobinson6@gmail.com

Hope you like it
Till next time

Jacqui out xx


Saturday 2 June 2018

Post it note teachers gift tutorial V 2 Saturday 2 June 18 using Stampin Up


Hi again everyone,

Jacqui here with another project for you.  I'm doing a series of gift ideas for teachers and this is the 3rd one.  This is another post it note holder (V2).

For my first one I used papers from my stash that I purchased in the Range.  The dies on the front are from Sue Wilson and the stamps are from SU, Flirty Flowers 
and Sunshine and Rainbows.


This is the view from inside.  I've used foil card from Kanban Crafts for the shadow box and heart.  The heart is embossed with a free folder from my stash.


For my Stampin Up one I've used the Share what you love Dsp which is more like card and great for construction.

The Stamp is from Myths and Magic and the die is from stitched labels framelits.


I've used an oval from Tonic for the centre.

The inside stamp is from Stitched all around.  The card for stamping on and the shadow box is Coastal Cabana.


Measurements in Inches

The Shadow box is 8 x 8
Score all sides at 1/2, 1,1 1/2 and 2.

The wrap is 9 1/4 x 4 1/2
Score LS at 4 1/4 and 4 13/16

Stampin Up Supplies Used

Coastal Cabana Card
Share what you love Dsp
Stitched Label Framelits
Stitched all around stamps
Myths and Magic stamps

Youtube
Facebook 
Email - jacquirobinson6@gmail.com

Hope you like.
Till next time

Jacqui out xx