Followers

Friday 28 December 2018

Tonic Nuvo Shimmer Powder backgrounds Friday 28 Jan 2019

Hi again folks 

So I survived Christmas and I hope you did too!  My amazing husband bought me an A4 Gemini whoop whoop!!!  I think we had such a terrible run up to Christmas with the cat severely breaking his leg (he's still in a cage and been moved to the craft room so I can watch him), then the heating breaking down for 4 days and finally I got flu (the heating's fault) so I'm just beginning to feel better but if it wasn't for my grandson I'd have cancelled Christmas dinner lol.  I think my husband wanted to do anything he could to make me feel better.  He's an amazing man!!!


Anyway I've made some backgrounds using Nuvo Shimmer powders and then just turned as many into cards (I've still loads to go lol) as I could.  I did a quick youtube video to show you what I did.
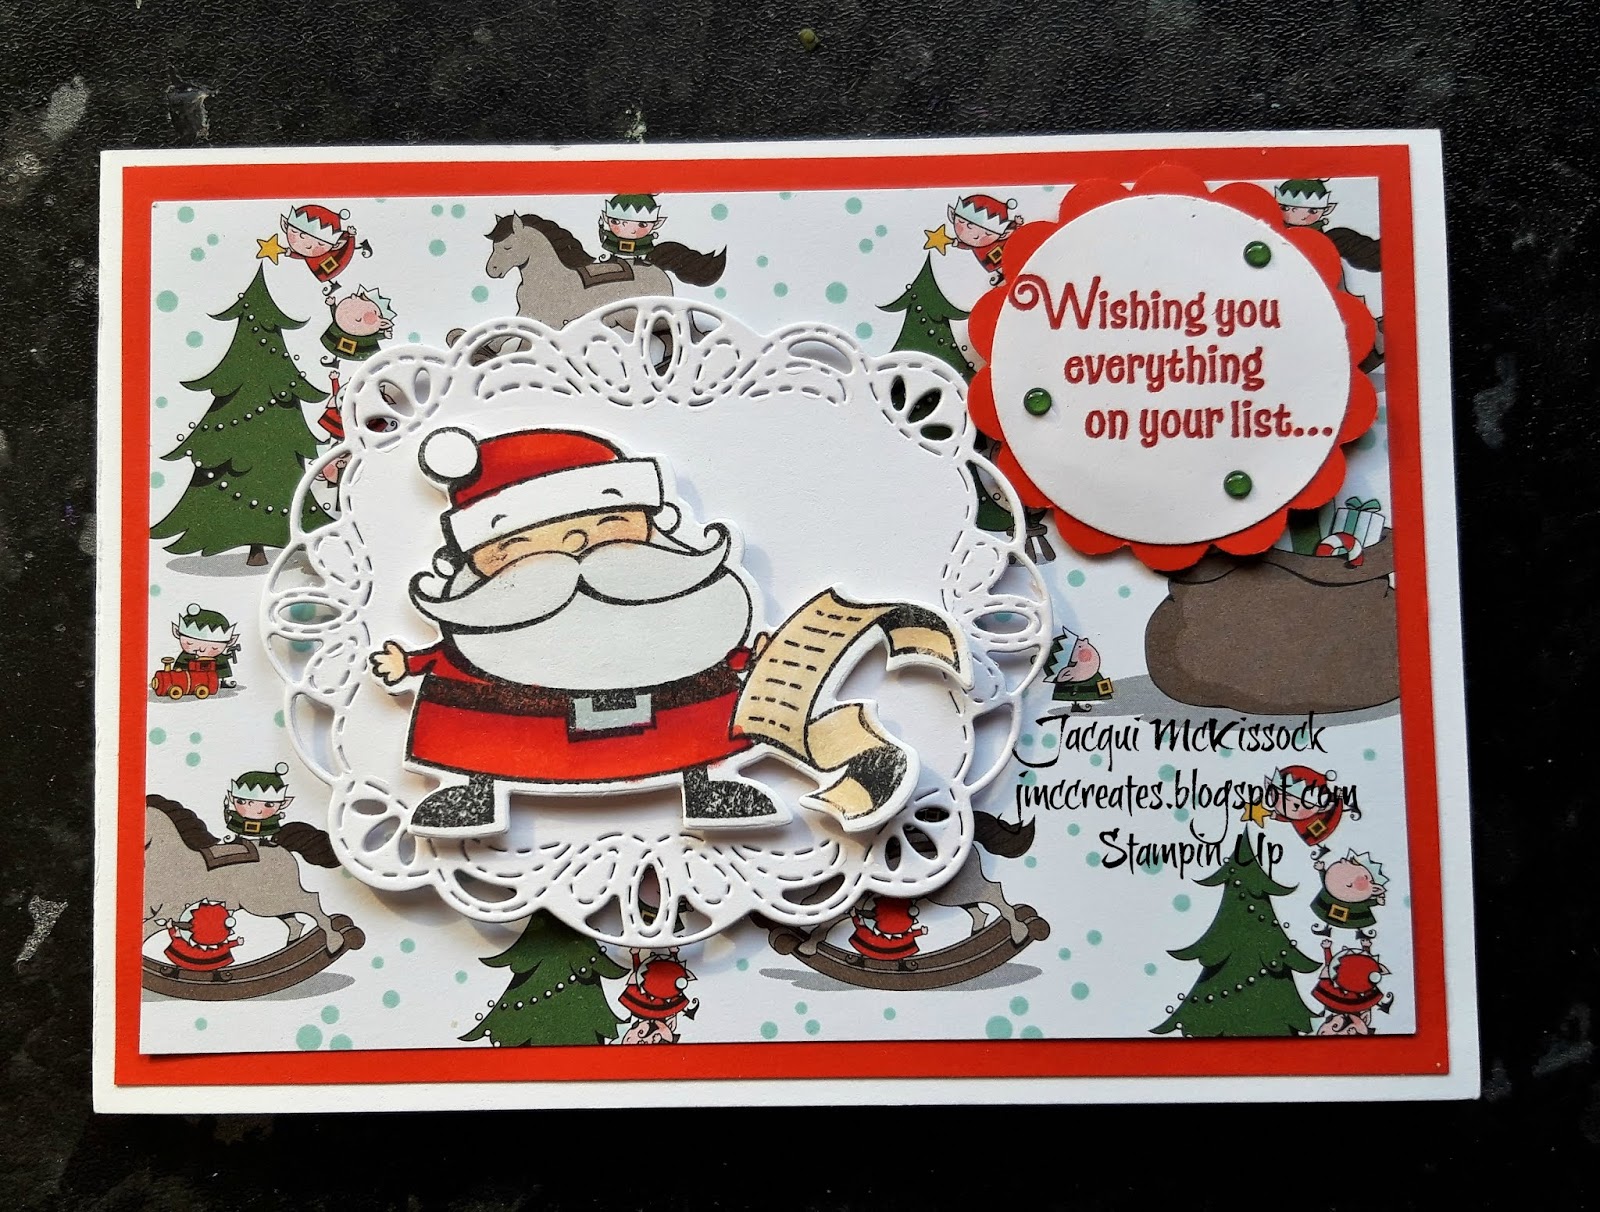

I hope you like
Till next time

Jacqui out xx

Facebook
Youtube
Pinterest
Instagram jacquimckissock


Friday 21 December 2018

Woodware stamps mousy Christmas card tutorial with matching envelope Fri 21 Dec 18

Hi there folks,

So the big day's nearly here!  This time next week it'll be all over and I have to say this year I'll be really glad.  Between cat drama and then heating drama it's been a tough expensive week and Christmas was nearly cancelled completely lol.

But I have a beautiful 5 year old grandson so for his sake we will persevere as usual.  Anyway onto the important stuff like Christmas card making.

Today I've made a beautiful Christmas card using a Woodware stamp called Mousy Christmas.  And because of the size of the stamp I've made my first DL card this year.

I've used a piece of 300gsm white card that's 8" by 8" and scored at 4".  I've also used a sheet of 12" x 12" to make the card and matching envelope.  I've used the envelope punch board to make the envelope and you can find the dimensions on my youtube channel.

I do hope you like it.
Till next time

Jacqui out xx

Facebook
Youtube
Pinterest
Instagram: jacquimckissock

Friday 14 December 2018

Kit Kat Teacher gift idea using Stampin Up Friday 14 Dec 18

Hi again all you crazy crafters,

I've got another idea for a teachers gift today.  I got some chunky Kit Kats at the shop and I thought they'd be perfect for an idea I had.  I got the idea from a Tic Tac box made by Linda Parker.  I just up sized it and adjusted some things.

Measurements in Inches

Outer Wrap 10 x 4 1/8

Score Long side 2 3/4, 3 5/8, 6 3/8 and 7 1/4

Kit Kat box re-inforced

7 x 5 5/8
Score all sides at 3/4 and 1/2

Band for over Kit Kat

A4 x 2 3/4

Score Long side 3 3/4, 4 9/16, 8 11/16 and 9 1/2


Layers

Stamping Layer 3 1/2 x 2

Dsp 3 7/8 x 2 9/16 4 pieces
3 7/8 x 5/8 2 pieces

Hope you like
Till next time

Jacqui out xx

Facebook
Youtube
Pinterest
Instagram: jacquimckissock


Tuesday 11 December 2018

Christmas Cards Tues 11 Dec 18

HI folks I've made some quick cards from all the bits of stuff I've coloured and not used and things I've die cut and not used.  I'm sorry that I forgot to take a photo of one of the cards I made before I gave it away.  But you'll see it on my youtube channel.
Lots of the images are free stamps with magazines and some where  bought on ebay.  I've also used some glitter card and some lawn fawn border dies. 


All the cards are A6 which is 11 1/2 x 8 1/4 scored at 5 3/4.

I used some Christmas patterned foil card on a couple and then backgrounds I made with distress inks on the rest.  I do hope you like.

Till next time

Jacqui out xx

Youtube
Pinterest
Facebook
Instagram: jacquimckissock

Saturday 8 December 2018

Shaker Christmas cards Sat 8 Dec 18


Hi again all you lovely crafters, Today I've got another Christmas card that's a shaker card.  I've used background stamps, distress inks, Tonic dies, foil card and sequins to make the two cards shown.  I also like to stamps my envelopes with the Happy Mail stamp I rec'd in a magazine free.


I love how these turned out.  I had some inked backgrounds I wanted to use and I was trying to recreate a previous shaker card in a smaller size.  The card base is stamped and embossed then the ink layer put on top.  I created a frame with two rectangle dies.  I put in my sequins and after putting a double layer of foam tape on my frame I added it over the top.  The dies are cut 3 times in white and once in gold and layered and to finish I added a few gems.


I hope you like it

Till next time

Jacqui out xx

Instagram: jacquimckissock


Thursday 6 December 2018

Wrapped mints and box for Christmas teacher gift Thur 6 Dec 2018

Hi again all you awesome crafters out there,

Jacqui back with another teacher Christmas gift idea. 


This time I found a box of individually wrapped mints in B&M Bargains and new immediately what I'd make with them.  I've seen loads of projects on youtube where people have wrapped individual Hershey Nuggets (American I believe) and I'm in Northern Ireland.


So I wrapped them individually and made a matching box to hold 6 so I got 4 sets out of one box of mints.

Measurements in Inches

To wrap the individual mints the paper measures 1 1/2 x 3 1/4.
Box 8 1/4 x 3 3/4 score all sides at 1/2 and 1.
Box wrap 5 1/16 x 6 1/4 score both sides at 1/2 and 2 1/4
Paper layer for the box top 1 1/2 x 6
Add sentiment, bow and gems to decorate

Hope you like it 
Till next time

Jacqui out xx

Facebook
Youtube
Pinterest
Instagram: jacquimckissock

Tuesday 4 December 2018

Shadow box Card Tutorial using Signs of Santa Tues 4 Dec 18

Hey there guys, gals n crafting pals,

Wacky Jacqui back with another awesome card tutorial for you.  Today we're making a shadow box card.  I saw Jennifer McGuire make this card and was hooked.  I've just adjusted it to UK sizing.  For my prototype I did some ink blending and used a free magazine stamp set.

For this one I've used Stampin Up Signs Stamp and die bundle with some ink blending.  I've done some ink blending and added some snow with a stamp from Creative Expressions.

Measurements in Inches

5 3/4 x 7 3/4 score 41/8
5 3/4 x 8 1/2 score 1/2, 4 1/4 and 4 3/4

Cut 1/16 or less of 1/2 section for and easier fit.

Oval or Rectangle die to cut center out.

Layers (ink blended sections) 5 1/2 x 3 7/8.

Hope you like
Till next time

Jacqui out xx

Facebook
Youtube
Pinterest
Instagram: jacquimckissock


Saturday 1 December 2018

Bauble gift for teachers Saturday 1 December 18

Hey there again guys, gals n crafting pals,
I'm back... lol

Today I'm gonna show you a bauble that each of my grandkids gets in there teacher gift bags.  The idea is that they put it on their tree each year and they remember the child and the year they rec'd it.  This original idea comes from Sam at Mixed up Craft in 2017 and hers is a larger version, then someone else did the smaller one (sorry no idea who!) and this is my spin on it.

Measurements in Inches

6 1/2 x 3 3/4

Long and short sides score every 3/4

LS 3/4, 1 1/2, 2 1/4, 3, 3 3/4, 4 1/2, 5 1/4, and 6

SS 3/4, 1 1/2, 2 1/4, 3

On the long side starting at the second square and doing every alternate one mark the centre at the top of the square and score diagonally to each corner of the square.  Repeat on every alternate square and this will leave you four squares with diagonal scores to each corner.  Turn to the opposite side and in the squares directly opposite repeat.  Then cut down every score line on the top and bottom of the long side and completely remove the square directly above your diagonally scored sections.  Make sure all the score lines are removed from the remaining squares.  Choose which side will be top and which will be bottom then in the centre of all of the top squares punch a 3/8 hole.  Burnish all diagonal folds and the bauble shape should become apparent.  Decorate while flat.  Glue sides together then glue bottom with each square fitting directly over the one before.  Put some twine through one of the holes then knot and pull through the rest of the holes from underneath to top.

I printed out my grandkids names and the year and punched them with Stampin Up Classic label punch.  I put a 1/8 inch hole in the end and threaded it onto the bauble.  To finish I added the mini tag die from Stampin Up Swirly snowflakes dies (released Christmas 2017).

Hope you like this awesome project.

Till next time

Jacqui out xx

Facebook
Youtube
Pinterest
Instagram: jacquimckissock


Thursday 29 November 2018

Stampin Up Signs of Santa Lollipop holders Thur 29 Nov 18


Hi there again folks,

Jacqui back with a lovely gift for the kids stockings.  A lollipop holder!!!  Yayy!!!  I decided this year to do lollipops instead of candy canes. 

I found these candy striped lollipops in B&M Bargains so they were perfect.  I stamped and coloured the elves from Stampin Up Signs of Santa stamp and die bundle.  I did purple, red, blue and green.


\Measurements in Inches

Card stock 9  x 3 1/2

Score short side at 3/8, 3/4, 2 3/4 and 3 1/8
Score long side 6 and 6 3/8

Layer 1 1 3/4 x 2 3/4
Layer 2 1 3/4 x 2 1/2

I used my scallop tag topper punch from Stampin Up for the top
And a 1/8 hole punch for the ribbon holes.

Hope you like this fun project
Till next time

Jacqui out xx

Facebook
Youtube
Pinterest
Instagram: jacquimckissock
 

Tuesday 27 November 2018

Lip Balm tag Tues 27 November 18

Hey there guys n gals

Jacqui back with another project for you.  I bought some lip balms at the £1 shop and they had there own plastic cover.  I have a die from memory keepers that has lip balm covers but it's for the long ones.  When I saw this one I wondered if I could re use the cover and make my version and I did.


I took an Elizabeth Crafts tag and cut it out 3 times.  The back layer was white for stamping my to from etc.  The middle layer was a plain colour and then a patterned paper for the top.  The die has a decorative but which I cut out of the paper so you could see the colour behind.  I took the fifth circle die from Tattered Lace Stitched and cut it out of the paper.  The plastic bit fits in this hole.  I then took 5 and 6 and cut a plain frame for over the top of the plastic and paper.  Then it's all glued together and decorated.  The long ones are made with a my minds eye die and plastic pockets.


I do hope you like
Till next time 

Jacqui out xx

Facebook
Youtube 
Pinterest
Instagram jacquimckissock

Thursday 22 November 2018

Shaped Christmas Shaker card Thur 22 Nov 18

Hi all my crazy crafting buddies

I have a cute Christmas card today.  It's made from some of the gifts I rec'd in a pocket letter swap from the lovely Sue Bishop of Sue Bees.  

I took 2 flower shaped card bases from my stash.  I split one ih half and put acetate on it.  I then added foam tape to it.  I put some matching sequins in the centre of the other card base and lay the acetate piece over the top and pressed.  

I added a holly stamped and cut out image to one side and put my Mr and Mrs Claus on top.  I added my black strip sentiment to finish.

It really was a quick easy card to make and has maximum impact.

Hope you like it
Till next time

Jacqui out

Facebook
Pinterest
Youtube
Instagram; jacquimckissock

Saturday 17 November 2018

Box card (Walla inspired) using Stampin Up Sat 17 Nov 18

Hi again gals, guys n crafting pals,

Today I have another style of box card for you.  I found this on Walla Stamping and adjusted the measurements to fit a UK A6 card.

You need a piece of card that measures 8 1/2 x 4 1/8

Score at 5 3/4 and 5 7/8

The next piece measures 9 x 4 1/8
Score at 1/2, 2 1/2, 6 and 8

Inserts are 1 x 4 7/16 (1)
4 7/16 x 3/4 (2)
Score both sides at 1/2 on all of them

Layer 1 for front and inside front 5 1/2 x 3 7/8 (2)
Dsp layer 3 5/8 x 5 1/4 (2)

Layer one for sides 3 7/8 x 1 3/4 (2)
Dsp layer 3 5/8 x 1 1/2 (2)

Dsp for front of box part and inside is 3 1/4 x 3 7/8 (2)

Stampin Up Supplies used

Spirited Snowmen stamps 
Seasonal chums stamps and dies
Signs of Santa stamps, dies and dsp
Real Red card

I hope you like it

Till next time
Jacqui out xx

Facebook
Youtube
Pinterest
Instagram: jacquimckissock


Thursday 15 November 2018

Magic slider card using Stampin Up Thur 15 Nov 18

 Hi again folks I'm back lol,

Today I've made a magic slider card using stamps dies and papers.  

I bought a die to make this because I have severe cataracts and it was easier to use.  Fortunately I've had one eye operated on since I made this and it makes crafting so much easier.

There are youtube videos that make this card without the die so remember to search and check them out.

I just loved the fun element of this card so I wanted to make one.
 Items Used to make this were:

Stampin Up Signs of Santa stamps and dies
Signs of Santa Dsp
Poppy Parade card

Other Supplies used

Free papers from a magazine
Kraft Card
Lawn Fawn Magic Slider Card

The whole top section is the Magic slider card dies and it's then mounted on the card base 11 1/2 x 4 1/8 scored at 5 3/4.  The dsp measures 5 1/2 x 3 7/8.

Hope you like it and give it a go

 Till next time

Jacqui out xx


Facebook
Youtube
Pinterest
Instagram: jacquimckissock