Followers

Wednesday 31 January 2018

Scrap background with dies, embossing folders and Stampin up


Hi again guys, gals and crafting pals.  I'm back again with another project this time I've been using strips of scraps to make backgrounds then adding embossing folders and dies to make them into cards. 

To make the backgrounds I cut a piece of 5 3/4 card by 4 1/8 and stuck some stick it double sided sticky sheets over it.  I then got my scrap box and my guillotine out and cut lots of small strips 1/4 inch or less.  I peeled off the stick it top layer and lay the strips diagonally across it.  For the celebrate cards I used a random blue green and purple pattern.  For the first card I cut the whole piece in half and used a Stampin up celebrate die from the "Celebrate you" thinlets on the right side.  I then cut a piece of white card the same size and put stick it on top and stuck it behind the celebrate section.  This allowed me to add white glitter into the celebrate cut out section.  The card base is 5 3/4 x 4 1/8 so I cut a matching blue layer at 5 1/2 x 3 7/8 and then a white layer at 5 1/4 x 3 5/8.  I lay my celebrate section across the card to decide where I wanted my you stamped and then used the you from the "Amazing You" stamp set.  I then embossed the top half only with an embossing folder.  After adding foam tape to the back I added my celebrate section and finished with a couple of Stampin Up enamel stars.


For the second card I cut the remaining patterned piece in half and embossed a piece of 5" x 2" white card.  I stuck the cut patterned section on each side and glued the celebrate diecut that came from the previous card onto the right side I added foam tape behind.  I cut the same size blue and white layers as on the previous card and glued them onto another 5 3/4 x 4 1/8 card base, then added my top layer and finished with 3 enamel stars.


For the second card I repeated the same strip, stick it technique as above only this time I used a set pattern.  Once complete I embossed the whole piece with a dot embossing folder and added some Berry burst ink to highlight the embossing, I used the same size card base as above and added a 1/4 smaller layer in gold and cut the background 1/4 smaller again.  I added a strip of matching green and pale pink on foam tape.  Then I used the Sunshine wishes heart and Love in gold and the you in green from the "Celebrate You" dies.  The pink banner is from the Petals and more thinlets.  The large green heart was cut using the "Sweet and Sassy" framelits.  I stamped the inside and envelope using the "Lovely inside and out" stamp set.

Coming next will be the lovely box I made to hold the 10 cards I made recently.

I hope you like my projects and if you want to contact me please do via my blog or at jacquirobinson6@gmail.com

Till next time 

Jacqui over and out xx


Tuesday 30 January 2018

Napkin box using Stampin Up Painted Love Dsp and Petal Palette stampss

Napkin Gift Box

Hi there again crafters, Jacqui here with another post for you.  Today I made a box for some body butter and I used the napkin fold technique.  I simply altered a turorial by Mixed up craft https://www.youtube.com/watch?v=lldgBGiJ7D8 to fit a 3x3 base instead of 6x6.  I think the pinks and golds together are so pretty!


This is a pretty elaborate box and it doesn't take much to do it.  As my box base is 3"x3" and the sides are 1 1/2 I used started with a piece of card that was 9"x9" as I made my sides re-inforced.  Simply score all 4 sides at 1 1/2 and 3. The lid is 7 1/8 x 7 1/8 and is also re-inforced score all 4 sides at 1" 2".  


The napkin section uses a piece of 6"x 6" card.
This is the Mixed up Craft tutorial I followed for the actual napkin fold https://www.youtube.com/watch?v=lldgBGiJ7D8


These are the supplies I used from Stampin Up

Simply scored                                      122334
Painted with love Dsp                         145580 
Petal Palette Stamp and die bundle     145974 
Gold foil card                                       132622
Painted with love 12x12 card pack      145582

I do hope you like my project and give it a go till next time

Jacqui over and out xx


Thursday 25 January 2018

Card making Day

I've been a magpie today!!!

Today i've been playing with shiny stuff lol!  I got some new stampin up dies and stamps yesterday so I had a play day today and here's some of the stuff I used.  You can get full details at end of post.  I do love a bit of shine don't you?  Or am I the only magpie I wonder? Hmmm I think not lol!


Yesterday I made my first card in ages as I've been doing 3d projects for the local charity shop.  I got new stamps and dies from Stampin up and I couldn't wait to play!!!

I created this beautiful rainbow card first and it put me in the mood for colour and shine.  For this one I used the new rainbow builder framelits.

Today I got my foils out and using stick it and double sided tape I created the following cards.
 For this one I put some stick in onto some card and die cut it with a Tattered Lace background die.  I then used some gold foil and some myths and magic glimmer paper for the layers.  The love is from Stampin up Sunshine Wishes dies.  The Banner is a homebase die.  


The heart one is some silver foil on card with stick it and coloured in lines with Spectrum Noir pens.  The heart die is a Sue Wilson cut out of white card and the foil is behind on foam tope.  The hugs die is cut from Stampin Up Lovely Words Thinlets.


(The card bases are all 5 3/4 x 4 1/8)

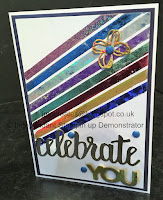
For the next card I put some double sided sticky tape diagonally across the card and lifted one section of at a time and put some scraps of foil in different colours over it.  The Celebrate and you are from the Celebrate You Thinlets which is free when you spend £90 or more during Sale a bration.  The butterfly is from the Sunshine wishes dies and I used a navy blue layer. For the pink one I cut out the dies from some foil on card scraps and decided what way I wanted them to look.  Next I stamped the you from the amazing you stamp set (free with £45 spend during Sale a bration) in silver embossing powder, I then put the top section about 2/3 of the way down into an embossing folder and ran it through my ebosser. After that all I had to do was stick the die cuts down and layer on some gold card. 

So I hope you like my first cards in ages if you want any supplies or have any questions please contact me at jacquirobinson6@gmail.com

Supply list 

Myths and Magic glimmer paper             145601
Sunshine Thinlits dies                              141489
Lovely Words Thinlits dies                      143733
Celebrate you Thinlit dies                        146480
Night of navy cardstock                           106577 
Silver Stampin emboss                             109131
Silver Foil                                                 132178
Gold Foil                                                   132622
Rainbow Builder Framelits                       145659

Till next time Jacqui over and out xx


Monday 22 January 2018

Valentines Box No 6 Using Stampin up and stash

Valentines Box Project No 6  

Hi there guys, gals and crafting pals I've popped in to show you No 6 in my Valentines gift ideas.  This series was designed to show how you can tell someone you love them without breaking the bank (or gaining lbs) lol

Today I used a piece of card from my stash for my Shadow Box base and then I stamp and embossed in gold onto some red card with a stamp from the Stampin up range "Touches of Texture".

I then used a stamp for the sentiment from "Festive Phrases" and cut it out with a layering oval.  I also cut a piece of gold with the next size up and that's all there was to it, quick, easy and beautiful!


For the Shadow Box base I used a piece of gold card from my stash and cut it to 9 1/8 x 7"  
Score all sides at 1/2, 1, 1 1/2 and 2.  Then with the portrait side or short side at the top score at 2 1/2 and 4 1/2 down to second score only.  You'll need to cut diagonally from the end of this score to the one below.  (See template)  Repeat on opposite side.


 The wrap section is 5 1/4 x 10, score on the landscape or long side at 3, 3 9/16, 6 9/16 7 1/16.


Cut shaded sections away.

You'll need the following supplies to complete this project:

Simply scored score board and stylus   122334
Touches of texture double stamp set     143251
Gold embossing powder                        143251
Real red card stock                                106578

Hope you like my latest project if you need help or supplies you can cotact me via jacquirobinson6@gmailcom or jacquimurphy1@hotmail.com.

Till next time Jacqui over and out xx


Valentines project No 5, Acetate treat box with Lindor Chocolate using Stampin up goodies

Valentines project No 5 using Stampin up goodies


Hi again guys, gals and crafting pals.  I'm back with No 5 in my series of valentine ideas.


For this one I made a box for a single mint Lindor chocolate.  I took a Stampin up mini clear treat box and added an insert from the white Myths and Magic Glimmer paper.  I used a Stampin up 1 1/4 punch to cut a hole in it for the chocolate.  Then I took the Sweet and Sassy heart framelits and some other smaller heart dies from my stash and cut them out in green and silver card from my stash and white glimmer paper.


Once the insert and Chocolate were inside it was simply a matter of layering different sized hearts up the front left side and a few on top left.  And I think it turned out to be a lovely little valentine treat box that anyone would love.

The insert is made from white glimmer paper that is 5 3/8 x 2 7/8 score the portrait or short side 1/2 both sides.  Then score the landscape or long side at 1/2, 2 7/16, 2 15/16 and 4 7/8.

Supplies used:

Simply Scored                                   122334
Myths and Magic Glimmer paper      145601
Acetate treat boxes                           141698

Hope you like my new project

Till next time 

Jacqui over and out xx

Sunday 21 January 2018

Valetines Project No 4 Fun fold pillow box using Stampin up products and a Ferrero Roche

Tiny Ferrero pillow box


Hi folks i'm back with another tiny project for 1 Ferrero Roche. 

 This time it's an unusual pillow box made by Heidi Smith of FlutterbyHeidi (link below).

This time i've used one of my favourite Stampin up Dsps it's called Foil Frenzy and I hope you can tell how luscious it is from the picture.  And as you can tell it's perfect for a Ferrero Roche, which I think are a great valentine token.

This project only uses a tiny amount of Dsp 5 1/2" x 4".

I also used stampin up dies for the tag and behind the sentiment and I used a punch for the sentiment (details below).


Heidi's tutorial:


Supplies used: Foil Frenzy Dsp                         144125
Tag from Swirly snowflakes Thinlets                  144678
Diamond Shape from Eclectic Layers Thinlets  143774
Classic label punch for sentiment                      141491
Hello Friend from A Good Day Stamp set         145873

If you'd like any supplies etc please contact me at jacquirobinson6@gmail.com

Hope you like my project 

Till next time Jacqui over and out xx

Valentines project No 3 Tiny exploding handbag for 1 Ferrero Roche using Stampin up

Tiny explosion handbag

Valentines Project No 3

Hi again guys, gals and crafting pals i've popped in today to show you a mini project, I got this tutorial from Helen Griffin on youtube (link below) and it's awesome.  I've used some retired 6 x 6 Stampin up dsp and the sweet and sassy framelits.  It's very quick and a perfect little valentine gift.


This is the link to Helens project https://www.youtube.com/watch?v=G4DMHqhd4x4


The with love and for you are tiny dies from my stash but you could use a stamp instead.

So I hope you like my project, till next time,

Jacqui over and out xx


Friday 19 January 2018

Craft room tidy!!!!


/My Craft room tidy adventure!!


Hi there guys, gals and crafting pals.  I've popped in today to VENT lol.   I watched an awesome video of Ann Melvin from Positively Papercraft https://www.youtube.com/watch?time_continue=6&v=8hVaVuLq9vA and it made me sit back and look around me.  I'm VERY lucky to have a large craftroom and a wonderful husband who will do whatever I ask him to in it.  But it's a mess so I've started the organisation and OMG I wish I hadn't it looks like a blinking tip and I was at it all day yesterday!!!

I have mobility problems so my husband put work surface on 3 of my walls so everything I use frequently like dies stamps etc are all at easy reach.  So I've got those all organised at last!!  The rest will do to the start of the week as i'm too tired and sore now so i'm gonna actually do some crafting now.

To finish I'd just like to say how much I admire Ann Melvin from  Positively papercraft http://www.positivelypapercraft.co.uk as she did all the building, drilling etc by herself and she's made herself and AMAZING work space so make sure you pop over and see it.


Till next time crafters Jacqui over and out xx


Wednesday 17 January 2018

Valentines project No 2 Heart box using Stampin up and stash

Valentines project No 2

Hi there guys, gals and crafting pals.  I've got a quick post for you today.  It's a lovely heart box for my husband and I'm gonna put his favourite maltesers in it.

This idea comes from an amazing crafter called Samantha Clayton of Mixed Up Craft and here's her tutorial.  https://www.youtube.com/watch?v=0mBs1WxXR-w&t=134s


I've used retired Stampin up DSP for my project but I've also used the Sweet and Sassy framelits (nesting heart dies) from Stampin up.  The rest of the stuff is all stash, stash, stash lol.


I hope you like and if you need anything don't forget to let me know at jacquirobinson6@gmail.com.

Till next time Jacqui over and out.


A Stampin up Painted with Love Dsp card and some stash, sectioned Ferrero Roche box

My Sectioned Ferrero Box (re-inforced)

Valentines project No 1


Hi again guys gals and crafting pals  Jacqui back with a Ferrero box using the Stampin up Painted with love DSP and card pack and loads of stuff from my stash.

I've decided to do some valentines ideas for you that won't break the bank and still show you care.  


Top of Box 


I've popped in to show you this lovely little box i've made for four Ferrero Roche. 
 I used the following:
 Stampin up Painted with love Dsp and card pack
The sentiment is from Stampin up Petal Palette
Retired balloon charm from stampin up
Gold thread from stampin up (to tie charm on with)
The flower is a Sue Wilson die
I cut out the top of the box with a Tonic insert die
Tag is from Hobbycraft
Gems and ribbon from stash
Die to cut sentiment out is Tonic


The measurements are Base (re-inforced) 10 5/8 x 8 1/4
Score all sides 1 3/4 and 3 1/2
Cut away 3 squares from each corner and wedge the remaining

Lid (re-inforeced) 8 1/4 x 8 1/4
Score all sides 1 1/8 and 2 1/4
Cut as for base.
Remember to die cut BEFORE sticking!!!

The flower is from the Painted with love Dsp and a white overlay on it.

The inserts measure 3 /12 x 3 1/2 you need 2.
Score at 1 3/4 on both
Cut halfway down from the top of one and the bottom of the other and place over each other.

If you'd like any supplies please let me know.  My email is jacquirobinson6@gmailcom

Anyway that's it for another day till next time 

Jacqui over and out. xxx


Tuesday 16 January 2018

A Mini re-inforced pizza box using Stampin up and stash

Hi there guys, gals and crafting pals it's SNOWING :) 


Before I tell you about my project I thought I'd take a minute to let you know what I do with my creations.  Once a fortnight my husband will take me to our local B&M and the pound store.  I pick up lots of little items and sweets to use for my projects.  Then once a month or so my husband takes all of them to our local animal charity.  They really love getting them and apparently they sell well.  In fact they know him by name now and love to see him coming, unfortunately I have health issues so don't leave the house much and have never met them.  But at least I know I  do something worthwhile with the stuff I make.  Anyway onwards and upwards as they say.

Here's a little box I made using the following:

Stampin up Sweet Soiree DSP
Stampin up Myths and Magic glimmer paper
Sue Wilson bow die
Card & a gem from my stash

This is a tiny little pizza box and as you can see holds a little flower bath bomb.


Here's the measurements I used in case you want to re-create it.

The base is just card from my stash and measures 8 7/8 x 5 1/2

Score landscape or long side at 3/4, 1 1/2, 4, 4 3/4, 7 3/8 and 8 1/8.
One side is an 1/8th of an inch bigger to allow for the re-inforced sides and will be the lid.

Then score portrait or the short side at 3/4, 1 1/2, 4, and 4 3/4.
Simply score and wedge remembering that the sides are re-inforced so in each corner section the 3 outside squares will be cut away and then wedge the last one.  Repeat in all four corners.  For the back section cut away the outside square and wedge the inside one. 

I put my Sweet Soiree Dsp on while the project was flat and used another Sue Wilson die from my stash to cut out a bit of the Myths and Magic glimmer paper as the green is a perfect match for the green in the paper.  I used a Spectrum Noir to colour my gem to match.

So I do hope you like my project and come back for some more till next time 
Jacqui over and out!


Monday 15 January 2018

I'mmmmmmmmmm BACK lol and I've joined Stampinup

Return to craft blogging.

Hi there guys, gals and crafting pals.  I havn't been around for quite some time mainly due to the fact I got married in November yayyyyyy.  I've had so much to do and while I've still been crafting I havn't had time to blog etc too so I havn't been doing any DT work..  I've also developed cataracts in both my eyes so it's making crafting a little more difficult than it should be.  I need a day procedure operation in both eyes but the waiting list is 2yrs for the first and 4 for the second!!!  So till then i'll get around it anyway I can!!

Stampinup

I've also found the Stampinup community since I last blogged and gotten involved with it and i'm into box making in a big way too. I joined Stampinup as a demonstrator simply because it was a great deal but I hope in the future to be able to do video tutorials and hopefully get some customers, I'd sure love to be your demonstrator!  But until then i'll just buy, create, blog and have fun.

So this is the first Stampinup project i'm sharing today.  I'ts a  lovely little card using the Stampinup stamp sets and dies.  Please forgive the colouring as I can't see up close much.  I used the following on this project:

Stampinup

 A Little Wild stamp set and Thinlet dies bundle
Touches of Texture a double box stamp set
Floral Statements
Pink gems

Card blank and envelope from Stash
Tattered lace straight layered circles
Tattered lace stitched layered circles


The main card picture was made with the A little wild bundle, the sentiment inside is the Floral Statements and the envelope and the bee around the edge of my card came from the Touches of texture which is a double stamp set bundle.

Anyway I do hope you like my little creation and please call again soon as i'm gonna have loads to show you.

Till next time craft create and most of all enjoy, from Jacqui over and out!